I spent most of the nineties worrying about whether I had enough 16mm stock left to finish a scene, not whether my sensor was capturing a specific mathematical curve. These days, I see kids spending thousands on the latest cinema bodies, convinced that a complete guide to log and grading is the magic key to making their footage look “expensive.” They treat log like a holy grail, when in reality, it’s just a way to stop your highlights from clipping into a white void and your shadows from turning into a muddy mess. If you think a fancy LUT is going to fix a shot where the light was poorly placed or the exposure was lazy, you’re not making cinema; you’re just buying a headache.
I’m not here to sell you on some theoretical math or a list of expensive plugins. I want to talk about what actually happens when you sit down in a dark room with a flat, grey image and try to find the soul of the scene. I’ll show you how to use log to preserve the texture of the light you actually worked so hard to set up on set, and how to grade with intent rather than just slapping on a filter. This isn’t about chasing a look; it’s about having the control to make the image match the story.
Understanding Complete Guide to Log and Grading
Look, before we get into the weeds, let’s clear the air: Log isn’t a “look.” It’s just a way of mapping the sensor’s data so you don’t lose the highlights or the shadows to a digital ceiling. When I’m on set, I’m not looking for a cinematic aesthetic in the viewfinder; I’m looking for enough dynamic range to ensure that if a window is blowing out behind a subject, I can actually pull some detail back later. If you’re shooting in 8-bit, you’re essentially trying to paint a mural with three crayons, no matter how expensive your lens is. You need the headroom provided by higher bit depth and color sampling to avoid that nasty, blocky banding in the sky that makes a professional shoot look like a cheap webcam stream.
Once you get back to the desk, you have to respect the distinction between color correction vs color grading. Correction is the heavy lifting—fixing the exposure, balancing the whites, and making sure the skin tones don’t look like they’ve been dipped in orange juice. Grading is where you actually start telling the story with mood. You don’t just slap a LUT on a clip and call it a day; that’s a shortcut that usually ends in disaster. You build a foundation first.
Key Things to Know
First, let’s get one thing straight: a log profile isn’t a “look.” It’s just a way of storing data so you don’t lose the highlights or the shadows when the sun decides to be difficult. If you’re shooting on a sensor that can actually handle it, you’re looking for color science and dynamic range that lets you breathe in post. If you don’t have the bit depth to back it up, though, you’re just filming digital noise and calling it “texture.” I’ve seen plenty of beginners try to stretch a 8-bit file like it’s saltwater taffy, only to watch the image fall apart the moment they touch a slider.
You also need to understand the difference between fixing a shot and styling it. I spend most of my time on color correction vs color grading; the former is the heavy lifting—making sure the skin tones look human and the white balance isn’t drifting—while the latter is where you actually find the mood. Don’t go throwing a heavy LUT on your primary footage and calling it a day. That’s a recipe for a clipped, ugly mess. You apply your conversion to Rec.709 first, get the exposure right, and then you start playing with the art.
Practical Tips and Steps
First, stop treating your LUT like a permanent filter. If you’re using a technical LUT to see what you’ve shot, that’s fine, but your actual lut application workflow should involve applying that conversion at the very end of your node tree or adjustment layer. If you bake the look into the footage before you’ve even balanced the exposure, you’re essentially asking a colorist to perform surgery on a patient that’s already been embalmed. You need to manage your exposure in the log space first, ensuring you aren’t clipping your highlights or crushing your shadows beyond what the sensor can actually recover.
Second, learn the difference between fixing a mistake and making an aesthetic choice. I see too many people jumping straight into “the look” before they’ve even addressed the reality of the shot. You need to master color correction vs color grading; correction is about making the image look like what your eyes saw on set—fixing white balance, exposure, and contrast—while grading is where the storytelling happens. Don’t try to force a mood onto a shot that was fundamentally broken in terms of light. If the light wasn’t there when you pressed record, no amount of clever grading is going to make it look intentional.
Common Mistakes to Avoid
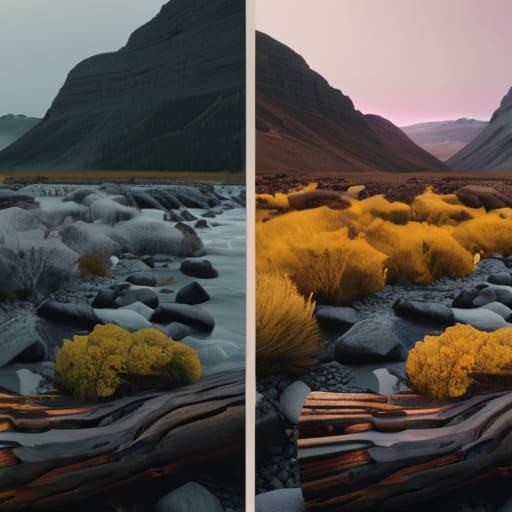
The biggest mistake I see is people treating a LUT like a finished product rather than a temporary roadmap. I’ve sat in edit suites where someone slapped a heavy-handed creative LUT on a flat log file and called it a day, thinking they’d achieved a look. They haven’t; they’ve just baked in errors. You have to respect the rec.709 conversion process by fixing your exposure and white balance before you even think about stylistic choices. If your base image is broken, no amount of fancy math in the software is going to fix it.
Another trap is getting lost in the technical weeds while ignoring the actual image. People obsess over bit depth and color sampling, thinking a higher spec will compensate for a poorly lit scene. It won’t. I’ve seen shooters ruin a beautiful moment by trying to force a “cinematic” look through aggressive grading on a file that didn’t have the underlying color science and dynamic range to support it. If you push the shadows too hard because you didn’t bother to catch the light on set, you aren’t grading; you’re just creating digital noise.
Final Thoughts
At the end of the day, don’t let the technicalities paralyze you. You can spend months obsessing over bit depth and color sampling, or you can just get out there and start shooting. The math matters, sure, but the math won’t tell you if a scene feels hollow or if the light is hitting your subject’s eyes in a way that actually tells the story. A massive sensor and a perfect LUT won’t fix a shot that lacks intention.
If you find yourself stuck, remember that color correction vs color grading is a distinction of purpose, not just a technical hurdle. Correction is about fixing what’s broken; grading is about deciding how the audience should feel. Master the former so you have the freedom to do the latter. Stop looking for the magic button in your software and start looking at your monitors. If you understand how to manage your dynamic range on set, you’ve already won half the battle. The rest is just patience and a steady hand in the edit suite.
Five ways to stop fighting your footage and start working with it
- Stop treating Log like a finished look. It’s a container, not a creative choice. If you try to “grade” a Log file by slapping a heavy LUT on it and calling it a day, you’re just baking in mistakes. Use the Log profile to capture the dynamic range, then build your look from the ground up using the data you actually have.
- Watch your exposure, especially in the shadows. People get so obsessed with not blowing out the highlights that they crush the blacks into a muddy, unrecoverable mess. A colorist can do wonders with a highlight, but once that shadow detail is gone, it’s gone. I’d rather have a slightly bright image I can pull down than a dark one I have to try and “lift” into existence.
- Respect the sensor’s limits. You can buy a camera with 15 stops of dynamic range, but if you’re shooting in a room with one tiny window and a pitch-black corner, you still only have what the light allows. Don’t rely on the Log profile to fix a lighting setup that’s fundamentally broken. Use a bounce or a cheap LED to fill those gaps before you even think about the grade.
- Don’t over-saturate the life out of your image. There’s a temptation in post to push the colors until everything pops, but that’s usually when you start seeing digital artifacts and skin tones that look like they belong in a neon fever dream. If the colors look “fake,” it’s usually because you’ve pushed the math too far. Real life has subtle transitions; your grade should too.
- Get your white balance right in-camera. I see people all the time trying to “fix” a botched white balance in the grade because they think that’s what colorists are for. It’s a waste of time. If you start with a consistent, accurate white balance, you’re working with a foundation. If you start with a mess, you’re just spending your entire editing budget trying to find neutral grey.
The Bottom Line
Don’t mistake a flat image for a finished one; Log is just a container for data, and it only works if you actually gave the sensor enough light to begin with.
A colorist is a surgeon, not a magician—they can fix a bad exposure or a slight tint, but they can’t manufacture detail that wasn’t captured in the first place.
Stop chasing the highest bit depth and start focusing on your lighting; the best grade in the world won’t save a scene that was poorly lit and even more poorly covered.
The Myth of the Magic File
You can spend ten thousand dollars on a sensor that shoots the most beautiful, flat, desaturated log profile in the world, but if you haven’t mastered the way the light hits the subject’s eyes, you’re just grading a well-documented mistake. A LUT isn’t a solution; it’s just a way to see what you should have been aiming for while you were still on set.
Gethin Moreau
The Bottom Line
Look, if you’ve followed along this far, you know that log isn’t some magic button that makes a cheap sensor look like Arri Alexa footage. It’s just a container—a way to hold onto the highlights and shadows so you aren’t fighting a losing battle once you hit the timeline. We’ve talked about exposure, the necessity of a solid color science workflow, and why you can’t just slap a generic LUT on a poorly exposed clip and call it “cinematic.” The takeaway is simple: grading is an extension of your lighting, not a replacement for it. If you don’t get the exposure right in the room, no amount of clever mouse clicks in DaVinci will save your image from looking like a muddy, digital mess.
At the end of the day, don’t let the technicalities of bit depth and color spaces paralyze you. The gear will always change, and the software will always get more complex, but the fundamental goal remains the same: telling a story through light and shadow. Stop obsessing over whether you have enough dynamic range to satisfy a spec sheet and start focusing on how the light actually feels in the frame. Use the tools you have to capture what you see, and use the grade to reinforce the emotion you intended. Everything else is just noise.
