
I spent three hours on a documentary set in a rented villa outside of Naples, watching a kid with a brand-new cinema camera try to “fix” a flat, washed-out face by adding a third light. He was convinced that more lumens equaled more quality, but all he was doing was drowning the subject in a sea of unmotivated brightness. He didn’t realize that understanding how negative fill works isn’t about what you add to the room, but what you have the guts to take away. We weren’t lacking light; we were suffering from too much of it, and no amount of expensive glass was going to create the shape that a simple piece of black fabric could have provided in ten seconds.
I’m not here to sell you on a lighting kit or walk you through a technical manual of luminosity ratios. I want to show you how to use shadows to create depth, how to manipulate the shape of a face, and why a $20 piece of foam core is often more valuable than a $2,000 LED panel. We’re going to talk about the practical reality of blocking light to find your image, rather than chasing a spec sheet.
The Art of Subtracting Light How Negative Fill Works

Think of light as a liquid that wants to fill every corner of a room. If you’ve got a key light hitting your subject, that light isn’t just staying on their face; it’s bouncing off the white walls, the floor, and the ceiling, wrapping around them until they look like they’re trapped in a lightbox. That’s when your image loses its shape. To fix it, you aren’t looking for more power; you’re looking to subtract. By shaping light with negative fill, you’re essentially telling those stray photons where they aren’t allowed to go.
I usually start by looking at the side of the face furthest from my source. If that side is too bright—too “filled in” by the room’s bounce—I’ll slide a black flag or even a piece of dark foam core into the path. This isn’t about making things pitch black; it’s about controlling light spill to ensure the shadows actually have some weight to them. When you get it right, you aren’t just darkening a face; you’re creating depth with shadows that separates the subject from the background, giving the frame a sense of three-dimensionality that no expensive sensor can fake.
Beyond the Brightness Shaping Light With Negative Fill
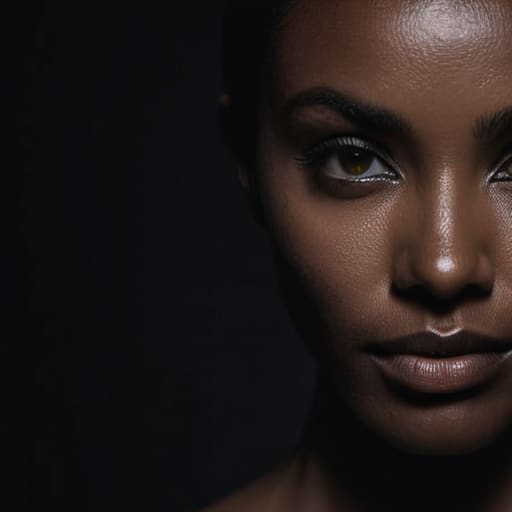
Most newcomers think of lighting as an additive process—more lamps, more power, more brightness. But after twenty years of seeing people chase high-wattage LEDs to fix a “cheap” look, I can tell you that the secret usually lies in what you take away. Shaping light with negative fill isn’t about adding a new source; it’s about managing the light you already have. When you’re working in a small room or a space with white walls, light bounces everywhere, hitting the subject from angles you didn’t intend. This creates a muddy, flat look that kills the mood. By placing a solid black material on the side of the face opposite your key light, you’re essentially reclaiming the shadows that the environment tried to steal from you.
It’s a fundamental part of creating depth with shadows, turning a two-dimensional face into something with weight and texture. I’ve spent more time moving a single black flag into position than I have tweaking a color grade, because once you’ve mastered controlling light spill, you stop fighting the camera and start directing the eye. If the image feels lifeless, stop looking at your exposure meter and start looking at where the light is hitting that it shouldn’t be.
Controlling Light Spill When Your Space Wont Cooperate
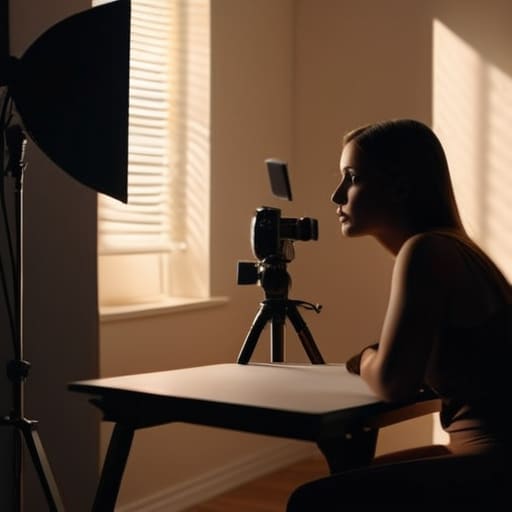
We’ve all been there: you’ve finally dialed in a decent key light, only to realize the white walls of a rental apartment or a sterile office are bouncing that light everywhere like a pinball machine. You try to add a rim light to separate your subject, but the bounce from the opposite wall just washes everything out, leaving you with a flat, lifeless image. This is where most people start panicking about their sensor’s dynamic range, but you don’t need a more expensive camera; you need to start controlling light spill.
When the room won’t cooperate, you have to treat the space like an enemy. I’ve spent half my career shaping light with negative fill just to counteract a poorly placed window or a bright ceiling. If you can’t move the walls, you bring your own shadows. Grab a black flag—or honestly, a piece of black foam core if you’re on a budget—and place it just out of frame on the side of the subject that’s getting too much reflected light. It’s about carving out the darkness to reclaim the dimension you lost to the room’s architecture.
Creating Depth With Shadows Rather Than More Lamps

Most newcomers think more light equals more quality. They arrive on set with a kit full of LEDs, thinking they can just blast the subject until the image looks “pro.” But if you’re just adding more photons to a room, you’re likely just washing out the dimension you worked so hard to build. Real creating depth with shadows isn’t about what you add; it’s about where you stop the light from going. When you use a black flag to pull the light off one side of a face, you aren’t just making it darker—you’re defining the shape of the person in front of you.
I’ve spent more time shaping light with negative fill than I have adjusting my aperture in the last decade. If a shot looks flat and lifeless, don’t reach for another lamp to fix the exposure. Instead, look at the side of the face that’s too bright and see if you can kill some of that bounce. By increasing image contrast through subtraction, you create a separation between the subject and the background that a sensor can’t manufacture in post. It’s the difference between a snapshot and a frame that actually feels like it has weight.
Using Black Flags in Studio to Kill the Bounce
When you’re working in a controlled studio environment, you’d think you’re in the driver’s seat, but the walls usually have other ideas. Most studio spaces are death traps for contrast; those white walls and light-colored ceilings act like giant, unintentional reflectors, bouncing your key light back into the shadows until everything looks like a flat, muddy mess. This is where using black flags in studio becomes your most essential tool. You aren’t just blocking light; you are actively reclaiming the darkness. By positioning a flag between your subject and a reflective surface, you stop that stray light from washing out the subtle details you worked so hard to light in the first place.
It’s a simple bit of shaping light with negative fill that separates a polished look from a video that looks like it was shot in a hospital hallway. If you notice the shadow side of a face is losing its shape because the light is bouncing off a nearby partition, don’t go hunting for a dimmer switch. Just slide a flag into the path of the bounce. It’s about controlling light spill with precision, ensuring that the shadows stay where you put them, which is ultimately how you build a sense of three-dimensional form on a two-dimensional screen.
Increasing Image Contrast Without Buying a New Sensor
I see it every week: someone spends six months saving for a camera with a higher dynamic range, thinking that’s the magic bullet for a “flat” looking image. They get the new sensor, roll the footage, and realize the image still looks like a washed-out mess because the room is filled with bouncing, directionless light. The truth is, you don’t need more stops of latitude if you aren’t managing the light you already have. Increasing image contrast isn’t about what the sensor can capture; it’s about what you refuse to let hit the subject.
If your frame feels thin or muddy, stop looking at your exposure settings and start looking at your shadows. By shaping light with negative fill, you’re essentially carving the subject out of the environment. When you use a black flag to catch the light that’s bouncing off a white wall or a pale ceiling, you’re restoring the distinction between light and dark that the camera needs to actually see shape. It’s much easier to create a striking, high-contrast look by subtracting light than it is to try and manufacture it with more expensive glass.
Five Ways to Stop Chasing Light and Start Controlling It
- Stop adding more lamps to fix a flat face. If your subject looks like they’re stuck in a midday sun with no shadows, don’t reach for another LED panel; just put a black flag on the opposite side of your key light. You’re not trying to make them brighter, you’re trying to make them three-dimensional.
- Watch your bounce, especially in small rooms. White walls are the enemy of mood. If you’ve got a beautiful, motivated light coming from a window but the whole room is glowing with a milky, low-contrast wash, use negative fill to kill that reflected light before it hits the shadow side of your subject.
- Use it to create separation when the background is fighting you. If your subject is blending into a bright or busy environment, a bit of negative fill on the side of their face can provide the edge needed to pop them forward. It’s about creating a visual hierarchy, not just adding darkness.
- Think about the “why” before the “where.” Before you throw a flag in the frame, ask yourself if the shadow is actually telling the story. If you’re shooting a documentary interview, a little negative fill can add gravity and weight to a serious moment, whereas a bright, even wrap might feel too much like a toothpaste commercial.
- Don’t forget the floor. We spend all our time worrying about the walls and the ceiling, but a light-colored floor is a massive bounce source that can ruin your lighting ratio. If you’re working on a tight budget and a tight space, sometimes the most important “negative fill” is just a piece of black fabric or a dark rug placed right under the camera’s line of sight.
The Bottom Line
Stop looking for more light when your image looks flat; start looking for ways to take it away.
A black flag is often more useful than a second key light when you’re trying to actually shape a face or create depth.
Real cinematography isn’t about how much light you can throw at a subject, but about having the discipline to control where it doesn’t go.
The Myth of the Perfect Light
Beginners always think they’re one more lamp away from a masterpiece, but they’re actually just one shadow away from it. Negative fill isn’t about adding something to the frame; it’s about having the discipline to take light away so the subject doesn’t just look illuminated, but actually looks like they exist in a three-dimensional world.
Gethin Moreau
The Bottom Line
At the end of the day, negative fill isn’t some high-concept theory you need a degree to understand; it’s just the practical act of taking something away. We’ve spent this time looking at how a simple black flag can stop light from bouncing off a white wall, how it creates the shadows that give a face dimension, and how it keeps your subject from looking like they’re trapped in a lightbox. Whether you are fighting spill in a cramped apartment or trying to add a bit of grit to a corporate interview, the lesson is the same: stop thinking about what you can add to the frame and start looking at where the light shouldn’t be.
I know the temptation is to keep scrolling through gear sites, looking for that one lighting kit or that specific sensor that will finally make your images look “pro.” But if you want to actually move the needle on your work, put the credit card away for a minute. Learn to see the light, learn to manage the bounce, and most importantly, learn to value the shadows. You can have the most expensive camera in the world, but if you don’t know how to shape the darkness, you’re just recording a very expensive, very flat mistake. Master the subtraction, and the rest will follow.
